
Instructions to compile, install, and run bladeRF-wiphy
To run bladeRF-wiphy on the bladeRF 2.0 micro xA9 so it can function with mac80211 and hostapd, and beacon as an Access Point (AP), follow the instructions below to build bladeRF, bladeRF-mac80211_hwsim, etc from scratch.
Compile bladeRF-wiphy and dependencies
Consider creating a directory such as ~/wiphy-build/ for fetching the following subsections’ repositories into. In the end, the directory hierarchy of ~/wiphy-build/ should look (approximately) as follows:
wiphy-build/
 ├── bladeRF
 ├── bladeRF-linux-mac80211
 ├── bladeRF-mac80211_hwsim
 ├── bladeRF-net
 ├── bladeRF-wiphy
 └── hostap
The first step then is to create ~/wiphy-build/:
mkdir ~/wiphy-build/
cd ~/wiphy-build/
The rest of this page assumes ~/wiphy-build/ is the current working directory.
Compile libbladeRF
Fetch the dependencies mentioned in the bladeRF wiki: https://github.com/Nuand/bladeRF/wiki/Getting-Started%3A-Linux#debian-based-distros-eg-ubuntu
Ensure ~/wiphy-build/ is the current working directory then git clone the bladeRF Github repository into ~/wiphy-build/bladeRF by calling:
git clone https://github.com/Nuand/bladeRF
cd bladeRF
mkdir host/build
cd host/build
cmake ../
make -j4
sudo make install && sudo ldconfig
For more instructions and troubleshooting build libbladeRF and the bladeRF tools from source take a look at: https://github.com/Nuand/bladeRF/wiki/Getting-Started%3A-Linux#Building_bladeRF_libraries_and_tools_from_source
Synthesize bladeRF-wiphy (optional)
This step is optional, to skip this step and download the synthesized bladeRF-wiphy RBF (wlanxA9.rbf) for the bladeRF 2.0 micro xA9 go to FPGA images .
Again ensure the current working directory is ~/wiphy-build/ and fetch the source from the Github repository into ~/wiphy-build/bladeRF-wiphy/
git clone https://github.com/Nuand/bladeRF-wiphy/
Generate the QSys cores:
pushd bladeRF-wiphy/fpga/ip
bash generate.sh
popd
Synthesize bladeRF-wiphy:
cd bladeRF
pushd host
mkdir build/
cmake ../
popd
cd hdl/quartus/
./build_bladerf.sh -b bladeRF-micro -r wlan -s A9
Build bladeRF-mac80211_hwsim
Linux’s default mac80211_hwsim kernel module can be used, however some features (such as changing channels) require the use of bladeRF-mac80211_hwsim. bladeRF-mac80211_hwsim is recommended, and can be compiled with these commands:
git clone https://github.com/Nuand/bladeRF-mac80211_hwsim
cd bladeRF-mac80211_hwsim
make -j4
cd ..
Build bladeRF-linux-mac80211
Prior to compiling bladeRF-linux-mac80211, ensure Generic Netlink and SSL libraries are installed:
sudo apt-get install libssl-dev libnl-genl-3-dev
bladeRF-linux-mac80211 is the usermode application that controls the bladeRF, and exchanges packets between libbladeRF and mac80211_hwsim through a netlink socket.
git clone https://github.com/Nuand/bladeRF-linux-mac80211
cd bladeRF-linux-mac80211/
make
cd ..
Build hostapd
Compile hostapd (currently tested with commit hash 1759a8e3f36a40b20e7c7df06c6d1afc5d1c30c7 ) using the following instructions. The reference hostapd.conf tested with bladeRF-wiphy can be fetched with wget. Before running hostapd, verify hostapd.conf to ensure operation is permitted and suitable for your domain, and channel availability.
git clone git://w1.fi/hostap.git
cd hostap
git reset --hard 1759a8e3f36a40b20e7c7df06c6d1afc5d1c30c7
cd hostapd
cp defconfig .config
make -j4
wget https://nuand.com/downloads/hostapd.conf -O hostapd.conf
cd ..
Fetch bladeRF-net (optional)
This is a simple Python Flask application that acts as welcome page for associated STAs! Fetching birb.png is optional.
git clone https://github.com/Nuand/bladeRF-net
cd bladeRF-net
wget https://nuand.com/images/birb.png -O images/birb.png
cd ..
Setup a DHCP server for STAs (optional)
If you are intending to run mac80211 in Access Point mode, and want to configure a DHCP server for associating devices, consider using isc-dhcp-server and apt-get install isc-dhcp-server.
To setup a 10.x.x.x subnet for associate STAs, add the following 10.x.x.x subnet to /etc/dhcp/dhcpd.conf:
subnet 10.0.0.0 netmask 255.0.0.0 {
range 10.0.0.100 10.0.0.200;
option routers bladerf.nuand.com;
}
Tell the DHCP server to listen to DHCP requests on wlan0 (or whatever the network interface name of bladeRF-mac80211_hwsim) , by adding the following lines to /etc/dhcp/dhcpd.conf :
INTERFACESv4="wlan0"
INTERFACESv6="wlan0"
Running bladeRF-wifi
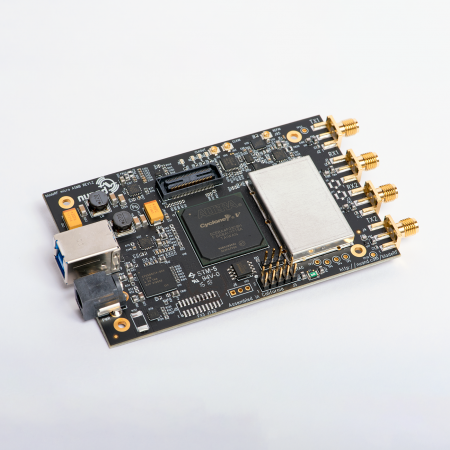
Ensure the bladeRF 2.0 micro xA9 is running a firmware version of at least v2.4.0. A quick check is to look at the “Firmware verion” line in the output of bladeRF-cli -e ver . Update the bladeRF’s FX3 firmware to v2.4.0 (or later) by fetching bladeRF_fw_v2.4.0.img from https://www.nuand.com/fx3_images/ and running bladeRF-cli -f bladeRF_fw_v2.4.0.img.
There are several moving parts that all need to be loaded and running simultaneously including bladeRF-mac80211_hwsim, bladeRF-linux-mac80211, and hostapd (if intending to run in AP mode).
These commands have to repeated after every system reboot. The goal of the following commands is to load the mac80211_hwsim kernel module, create the main network interface, and ultimately assign it an IP, routes, monitor mode interface, and DHCP server. This page assumes the mac80211_hwsim network interface is called wlan0, however things may be different on different systems, use ifconfig before and after calling insmod to find the name of the mac80211_hwsim network interface.
Load the kernel module
Ensure mac80211 and cfg80211 modules are loaded first, if they are not, modprobe them in:
sudo modprobe mac80211
sudo modprobe cfg80211
Use insmod to load the kernel module:
cd bladeRF-mac80211_hwsim/
sudo insmod mac80211_hwsim.ko radios=1
cd ..
Configure the network interface
Once the interface name is determined (and assuming it is called wlan0), configure the network interface.
If running on Ubuntu, disable Network Manager from controling the interface:
nmcli dev set wlan0 managed false
The remaining steps should generally be done in the following order:
ifconfig wlan0 down
ifconfig wlan0 hw ether 70:B3:D5:7D:80:01
ifconfig wlan0 up
iw wlan0 set bitrates legacy-2.4 6 9 12 18 24 48 54
iw dev wlan0 interface add mon0 type monitor
ifconfig mon0 up
ifconfig wlan0 10.0.0.1
ip link set wlan0 down
iw dev wlan0 set type monitor
iw dev wlan0 set freq 5825
ip link set wlan0 up
ifconfig wlan0 10.0.0.1
service isc-dhcp-server restart
This step should only have to done after reboots, or right after the kernel module has been inserted.
Load the FPGA
Either fetch the wlanxA9.rbf from https://www.nuand.com/fpga_images/ or build the RBF. Load the bladeRF 2.0 micro xA9 RBF containing the bladeRF-wiphy 802.11 modem by running:
bladeRF-cli -l wlanxA9.rbf
Run bladeRF-linux-mac80211
bladeRF-linux-mac80211 is the user mode application that controls and interfaces with the bladeRF and netlink socket, and must remain running for bladeRF-wiphy to run. These commands should be run potentially in another terminal:
cd bladeRF-linux-mac80211
sudo ./bladeRF-linux-mac80211
To set the frequency to a specific channel use command line argument -f and specify the frequency in MHz, e.g. 2.412GHz would require -f 2412. NOTE: Specifying a frequency should not be necessary if using bladeRF-wiphy-mac80211. Specifying -f disables
Run hostapd
Review the hostapd.conf and ensure the configuration is correct for your region and application.
NOTE: By default, hostapd.conf creates an open SSID.
If you wish to run an Access Point, run hostapd in another terminal:
cd ./hostap/hostapd
sudo ./hostapd hostapd.conf
In yet another terminal, wait a moment after launching hostpad and restart the DHCP server.
service isc-dhcp-server restart
Launch bladeRF-net (optional)
Launch the bladeRF-net FLask app to run on port 5000. The web server at http://10.0.0.1:5000/ should be accessible to devices associated to the Access Point.
cd bladeRF-net
python3 bladeRF-net.py
At this point an open SSID named bladeRF-net should be visible and able to be associated to by STAs. If bladeRF-net is running, try to navigate to bladeRF-net SSID gateway at http://10.0.0.1:5000/ !

Troubleshooting
In case something needs to be restarted. It is recommended to restart the process from right after loading the kernel module. However if a full reset is necessary, try to rmmod mac80211_hwsim.ko (or reboot the system if all else fails).
Miscellaneous commands
To enable a monitor mode interface for the bladeRF-wiphy interface:
iw dev wlan0 set type monitor
To change channels, use the iw dev commands prior to running hostap:iw dev wlan0 set freq 2412
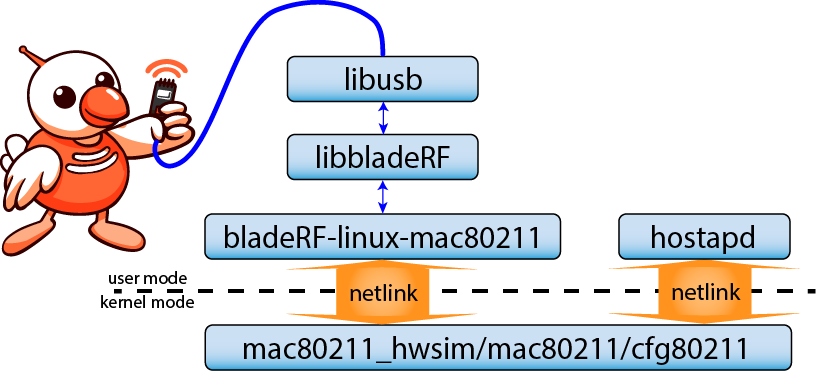
Theory of operation
As a brief explanation of
After loading wlanxA9.rbf, the bladeRF 2.0 micro xA9 is controlled by a program called bladeRF-linux-mac80211 ( https://github.com/Nuand/bladeRF-linux-mac80211 ). bladeRF-linux-mac80211 uses libbladeRF to exchange digital payload packets between the modem in the FPGA, and mac80211 through a netlink socket and mac80211_hwsim. bladeRF-linux-mac80211 relies on the existence of mac80211_hwsim to send and receive netlink packets.
A received 802.11 packet that is decoded by the FPGA is transmitted to the host PC through USB. libbladeRF receives the packet (with the help of libusb) and returns the packet to bladeRF-linux-mac80211’s pending bladerf_sync_rx() call. bladeRF-linux-mac80211 then creates a netlink packet to further send the received packet to the mac80211_hwsim kernel module. Upon receiving the netlink packet containing the received 802.11 packet, the mac80211_hwsim kernel module inserts the 802.11 PDU into mac80211. At this point the mac80211 stack takes over.
Conversely, a packet that is generated by the mac80211 stack is send received by the mac80211_hwsim kernel module, which then uses its netlink socket to further send the packet to bladeRF-linux-mac80211. In user mode, bladeRF-linux-mac80211 receives the netlink packet from the kernel, prepares it with the appropriate hardware header, and calls bladerf_sync_tx() to send the digital payload to modem on the bladeRF 2.0 micro for modulation.